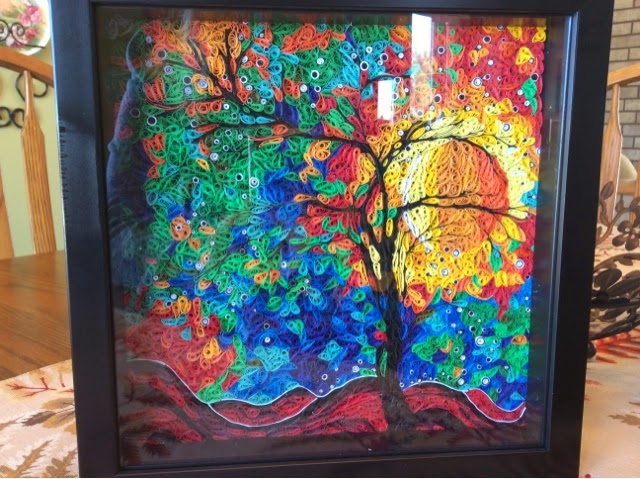
EDIT: I've been writing up this tutorial for a while, after I finished my 'first' completely quilled picture, that abstract tree sunset one (in picture). So some things I say in here are slightly different from how I've recently tweaked my method. I left most of it as is and added a few things, near the end under tips I will discuss more tips I've recently figured out :).
(Recap) I will be discussing this quilled picture most of the time when I discuss what I've done :).
I know that this looks overwhelming. There are so many coils in this, how on earth could you do it? I won't lie, it took forever. But overall, it wasn't too difficult at all. I have searched for quilling pictures on the internet, and I saw few like this one that could be a painting, that has a full background. I remember two notable exceptions. I would love to see more quilling pictures like this, and I would like to offer a few tips.
While something like this does take forever, if you print out a reasonably easy picture (one with limited tiny details, though some are okay, like the tiny circles on my quilled picture).
How to quill a picture (with separate tips to follow). Some of these steps and hints are meant for beginners, I don't mean to insult anyone's intelligence, I'm just covering all the bases.
1. Find/buy/make a frame. This is an important step, because you want to ensure your picture will be the ideal size. It has to be smaller than what the frame claims to be. Measure how much the sides will cut off, and how big the picture can be to be seen. Maybe cut off a quarter of an inch or centimeter to the visible area on each side to ensure it the right size. I suggest buying a shadow box. You could either buy a regular frame and take off the glass (which I don't prefer since your picture won't be protected), or find some other specialty frame without depth. I haven't found any, but I've read about a few.
2. Find a picture on the internet and print it out. If you're a good drawer, you could even draw something. I would suggest colored pencils or crayons and shade it so you know exactly what strips you need and where each strip goes. It's a good idea to know how you are going to quill it before you start.
-something abstract or uncomplicated is best. Don't pick something with too small of details,
because you need to be able to quill each part. Or, just simplify parts that look too small.
3. Get your strips/order more
You don't want to be too far into your project and realize that you are out of strips in a certain color! With quilling, it's something you have to order and isn't really at a craft store, as experienced quillers know (just some multi colored packs). I suggest using as many different shades of strips as possible. It's what makes it look the most interesting. Is your picture mostly blue or green? Go mad on ordering the most shades of each color as possible. Maybe five shades or something? They aren't that expensive per pack anyway.
-I prefer buying a bunch of single colors instead of shade packs (which is better than multicolor packs, since they have more colors of that particular color), because sometimes there are colors you don't use as often, then you could end up with a bunch of extra color you don't use much. It's worth the extra expense of single color packs for nice storage, and to get the most colors possible. Plus, you get more for your money.
4. Get some cork board and put some some wax paper on the print out on the cork. Get pins, strips, glue, toothpicks (or a glue bottle with a fine tip, which is easiest for me), ruler (you may need scissors, but for 3 mm strips I just rip them personally).
5. Decide on quilled shapes/size.
I used different shapes everywhere to completely fill in each crack, but that isn't totally necessary. Tear drops are good for leaves, long rectangles for trees, maybe ovals for clouds? That's what's cool about quilling, you have an option of shaping each shape which is unique to the craft, giving it a different feeling. I suggest using as small coils as comfortably possible. I used three inches, though some of the circles are only half inch coils. Maybe some detailed coils you could stand making smaller like two inches? The smaller the coils, the better.
6. Start quilling!
***TIPS***
-I highly discourage the use of a slotted tool, at least, the crimp in the middle doesn't always look good. You could use a needle tool, but I never understood them lol.
-instead, run your thumb along a strips a few times and roll with your fingers make the inside as tiny as possible. The smaller the coil, the more important that is.
-if you have a really small, skinny area on your picture (like the branches on my picture), there are two ways you could do this, depending on how thick it is. First, finish your coils on one side of the small branch/ whatever it is. You can either:
-set the strip alongside your coils, and mark with your finger where it ends. Start folding it a few times to your desired thickness. Really thin ones I folded twice, the thicker ones three or four times.
-for slightly thicker areas, you can just loosely roll your coil so there's lots of space. Then, fold your coil. See how big it is compared to how big the area it is your coil needs to fill. Fix the coil as necessary.
**New tips I've developed from my half sunset/half night picture**
My first picture didn't involved much blending. Because of this, I just had to figure out how I wanted to blend some things.
-Some pictures don't need to be blended as much as others. In a sunset, it's quite pertinent to the overall look.
-It may be obvious by looking at it, but the best way to blend is to buy as much different shades of a color as possible. Unfortunately, it's not possible to blend seamlessly. The best thing to do is start with all of one shade. Then, slowly start to add some coils of the darker/lighter color. Start with just a few here and there, then add more until it's completely in. It's best to add some of slightly different shades even in areas that are supposed to be the same color so that it adds interest and breaks up the single color (like, I added some orange into the red way before I changed the color to a brighter orange/yellow color).
-Sizes of coils:
-it's best, I think, for most coils to be the same size throughout your picture. This rule can and should be broken sometimes, however. In my picture all coils are three inches, but the tree ones are two inches. I figured it would look better for my tree to have smaller coils since I think it requires more detail. Maybe you want something to stand out on your picture. This is another good time to add in some smaller coils. If there are little 'filler' areas this is another fine time to add in smaller coils. Like some of the tiny coils in between the tree here.
*What to do while you quill?*
-Pictures like this I really like because it doesn't require as much of
your attention as quilling flowers might. Just glue each coil on and pin
it. Easy as that! You could even watch netflix or listen to a book tape (I've been listening to book tapes with my half sunset/half night quilled picture. I really enjoy it as my brain is free to listen, while my hands are busy)
or something. I went crazy watching lots of dr. Who while making that
quilled picture. It's best to have the movie close to you so it's easy
to watch and quill. I watched netflix on my tablet, maybe you have a
laptop, or you could find a close seat to the tv. Or maybe you want no
stimulation at all! Whatever floats your boat.
Any questions are welcomed ^_^.
**I am currently working on a very intricate quilled picture where I will be adding in more tips. So be on the lookout for that. This post will be updated around then, most likely.**